How to migrate your old bwCloud Freiburg images to the new bwCloud
A service of the bwForCluster NEMO.
DISCLAIMER
This in an unofficial migration guide. We do not guarantee for broken images or if the guide does not work as described.
Community Migration Guide
This guide is only for users of the University of Freiburg who have bwCloud images in the old Freiburg region and want to migrate them to the new bwCloud. If you want to contribute, fork the repository and create a pull request with your changes.
First Configuration Steps
First you need to instal the command line interface tools and set up credentials for the old bwCloud.
Follow these steps:
- First install
python-openstackclientCLI, e.g:Some distributions provide packages that you can check first. Windows users might try to use Windows Subsystem for Linux or install Linux in VirtualBox, etc.$ pip install python-openstackclient --user - Create a credentials file for the old bwCloud instance, e.g.:
bwcloud-old-creds.shCopy the contents of the following code window and replace<RZ_ID>with your university ID, e.g. the one you use for myLogin or myAccount. Change your project name if necessary.#!/usr/bin/env bash export OS_AUTH_URL=https://idm01.bw-cloud.org:5000/v3 export OS_USERNAME="<RZ_ID>@uni-freiburg.de" # change to old group project if necessary, e.g. freiburg_mygroup export OS_PROJECT_NAME="Projekt_$OS_USERNAME" unset OS_PROJECT_ID export OS_USER_DOMAIN_NAME="Default" if [ -z "$OS_USER_DOMAIN_NAME" ]; then unset OS_USER_DOMAIN_NAME; fi export OS_PROJECT_DOMAIN_ID="default" if [ -z "$OS_PROJECT_DOMAIN_ID" ]; then unset OS_PROJECT_DOMAIN_ID; fi unset OS_TENANT_ID unset OS_TENANT_NAME echo "Please enter your OpenStack Password for project $OS_PROJECT_NAME as user $OS_USERNAME: " read -sr OS_PASSWORD_INPUT export OS_PASSWORD=$OS_PASSWORD_INPUT export OS_REGION_NAME="Freiburg" if [ -z "$OS_REGION_NAME" ]; then unset OS_REGION_NAME; fi export OS_INTERFACE=public export OS_IDENTITY_API_VERSION=3
Migrate Images
To migrate images, please follow these steps:
- Open a shell like
bashor if you use a inkompatible shell like fish, startbash. - Source your old bwCloud credentials.
You will be prompted to enter your old bwCloud password.
If you do not remember it, bwCloud support will have to generate a new one for you.
$ source bwcloud-old-creds.sh Please enter your OpenStack Password for project Projekt_<RZ_ID>@uni-freiburg.de as user <RZ_ID>@uni-freiburg.de: - Run
openstack server list. You should see your images or the images from your group project. Copy the ID of the image you want to download, e.g.7fd1037e-b9fa-464b-9704-0dd60461d83a. - Check if there is a snapshot for this image that you can download.
To check this, use this ID to get the ID of the snapshot:
If there is no snapshot you can generate one yourself:
$ openstack image list --shared | grep 7fd1037e-b9fa-464b-9704-0dd60461d83a | 3e51e17a-c04d-345a-8712-a13f3b8fb99b | 7fd1037e-b9fa-464b-9704-0dd60461d83a-snapshot-2022-03-11-19-40-06 | active |$ openstack server image create --name 7fd1037e-b9fa-464b-9704-0dd60461d83a-snapshot-$(date -I) 7fd1037e-b9fa-464b-9704-0dd60461d83a - Use the snapshot ID for your download:
$ glance image-download 3e51e17a-c04d-345a-8712-a13f3b8fb99b --file myimage.img --progress - Once your image is downloaded, visit https://portal.bw-cloud.org/project/images and select "Compute -> Images":
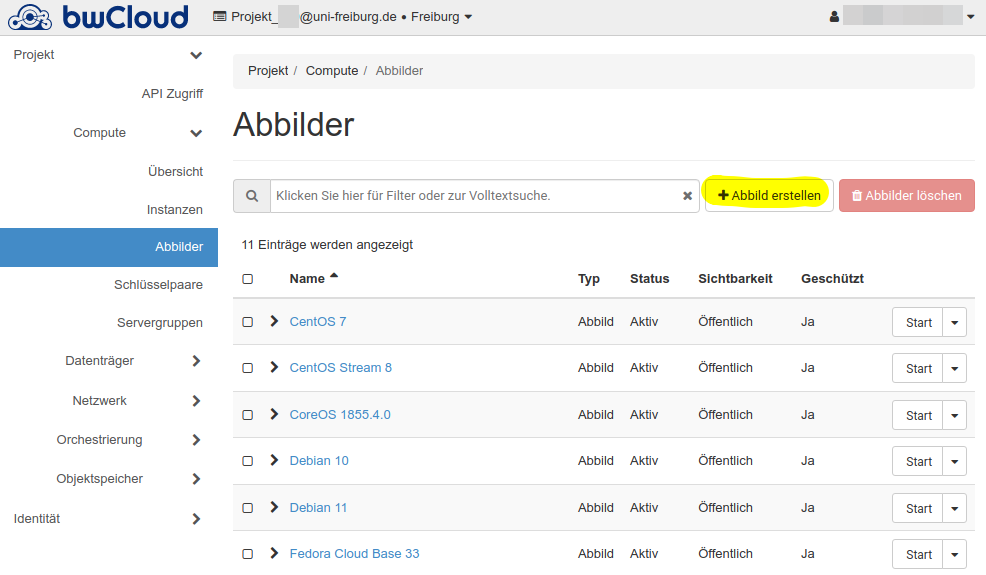 If you want to use the CLI, go to section Upload Image through CLI.
 - Configure your image and upload it. The minimum settings for hard disk and RAM are optional. Select the visibility Private!
Attention
If you don't choose the visibility "Private", others can use your image as base image for their services.
 8. You can start a new instance with this image.
Many other OpenStack settings need to be reconfigured, e.g. "Security Groups".
This is not covered in this guide.
8. You can start a new instance with this image.
Many other OpenStack settings need to be reconfigured, e.g. "Security Groups".
This is not covered in this guide.
Migrate Volumes
To migrate volumes, please follow these steps:
- Open a shell like
bashor if you use a inkompatible shell like fish, startbash. - Source your old bwCloud credentials.
You will be prompted to enter your old bwCloud password.
If you do not remember it, bwCloud support will have to generate a new one for you.
$ source bwcloud-old-creds.sh Please enter your OpenStack Password for project Projekt_<RZ_ID>@uni-freiburg.de as user <RZ_ID>@uni-freiburg.de: - Run
openstack volume list. You should see your volumes or the volumes from your group project. Copy the ID of the volume you want to download, e.g.da832458-2b9a-144b-2904-0dd604d261da. - Create a new image from this volume:
If you have errors running this command, see Troubleshooting for a solution.
$ openstack image create --volume da832458-2b9a-144b-2904-0dd604d261da --force newimagename - Check if the volume image is already created.
$ openstack image list | grep newimagename | 93da1233-bfee-453b-9c1d-59aa45da20c7 | newimagename | active | - Use the new image ID for your download:
$ glance image-download 93da1233-bfee-453b-9c1d-59aa45da20c7 --file myvolume.img --progress - Upload your image to OpenStack (see steps 6-8 in section Migrate Images or Upload Image through CLI.
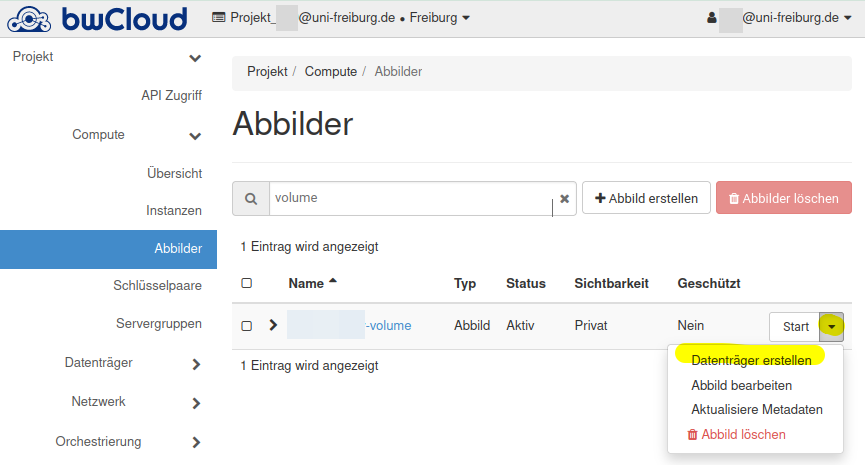
- Once your image is uploaded, you can create a volume from it.
Do this either in the GUI or use the CLI.
For the GUI, visit https://portal.bw-cloud.org/project/images and select "Compute -> Images".
Select "Create Volume" from the menu.
 For the CLI, you must first set up your credentials.
To do this, follow steps 1-4 from the section Upload Image through CLI.
Then check the ID of your image with
For the CLI, you must first set up your credentials.
To do this, follow steps 1-4 from the section Upload Image through CLI.
Then check the ID of your image with openstack image list. Next, check the size of this image:Unfortunately, the sizes are displayed in different units, so$ openstack image show --human-readable 991346f0-7780-19f3-34b1-c854c45105daopenstack image showshows the size in GB, but GiB is used when creating (e.g. 12.9GB ~ 12GiB). Now use the image ID to create a volume:$ openstack volume create --image 991346f0-7780-19f3-34b1-c854c45105da --size 12 myvolume # change size
Upload Image through CLI
If uploading via the graphical user interface does not work for some reason, you can try it via the command line interface. First, perform steps 1-5 in section Migrate Images or steps 1-6 in section Migrate Volumes.
Then, follow these steps:
- Login to bwCloud: https://portal.bw-cloud.org/identity/application_credentials/.
Select "Identity -> Application Secrets".
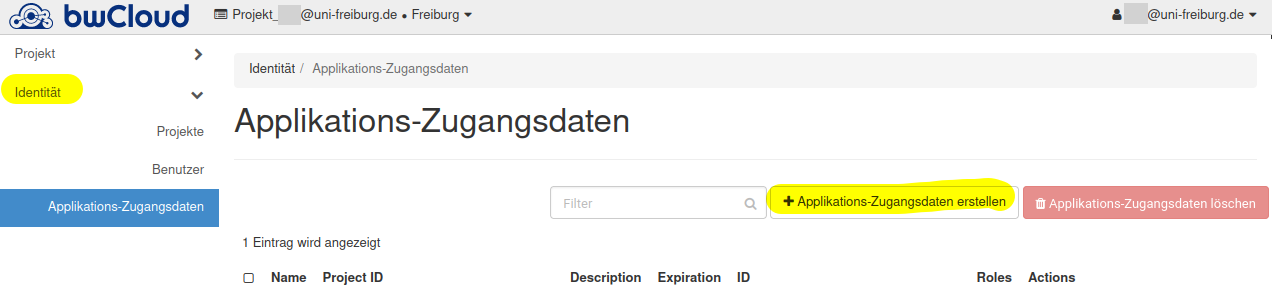
- Select a name and set a strong secret.
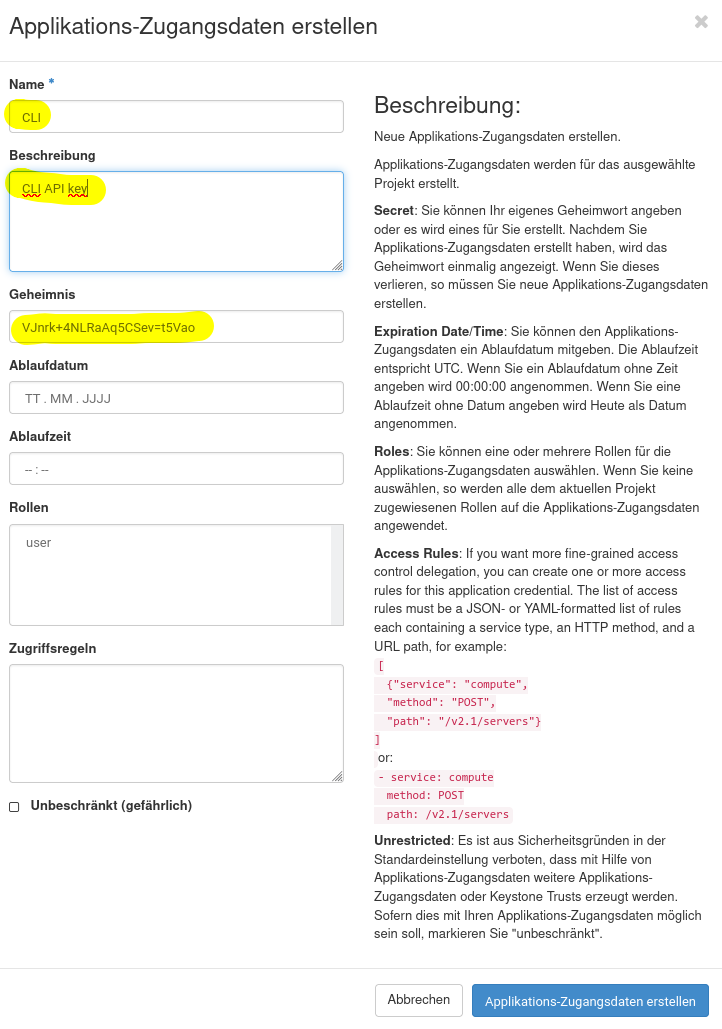
- Download
openrcfile. - Open a new bash window and source the credentials:
$ source app-cred-CLI-openrc.sh - Create/Upload image to new bwCloud:
Check status with
$ openstack image create --file myimage.img --private myimageopenstack image list.
Troubleshooting
If you get an error while running step 2 in the guide "Migrate Volumes", you can try to downgrade your tools. One error which is pretty common is this:
TypeError: upload_to_image() got an unexpected keyword argument 'visibility'
This version numbers worked after some trial and error:
$ pip install python-openstackclient==3.18 --user
$ pip install python-cinderclient==5 --user
To update your tools back to the current version, run:
$ pip install python-openstackclient python-cinderclient --user --upgrade
You can also patch the tool locally:1
$ sed -Ei "/kwargs.get\\('visibility'|protected=True/s/^/#/" ~/.local/lib/python*/site-packages/openstackclient/image/v2/image.py
-
See https://storyboard.openstack.org/#!/story/2009287 for problem description, visited 18.03.2022. ↩